Scheduling Information for Source Code Targets
The next page is where you specify information such as the test run date and any other files necessary for running the test.
The Main Schedule Page Controls
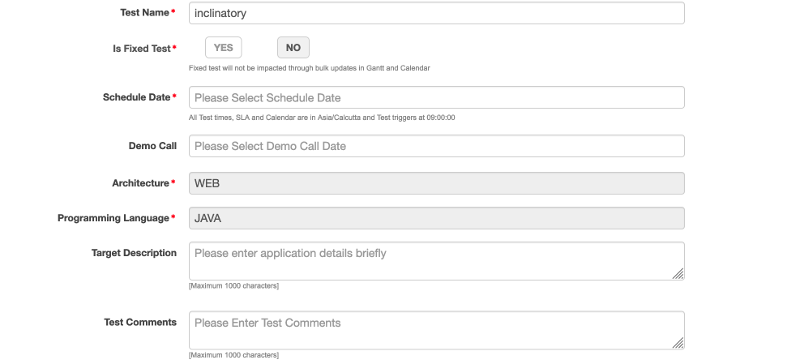
An asterisk (*) indicates a required field.
Test Name* : A name that identifies the test.
Is Fixed Test* : Marking a test as Fixed ensures that the scheduled date for this test is not affected by the rescheduling of other tests due to Gantt or Calendar operations.
You *can* change the scheduled date of a fixed test by using the **TEST > Test Info** page.
Schedule Date* : Use the pop-up calendar to choose a start date for the test.
For a 3D service, the calendar does not let you choose dates that are reserved for another scheduled test \(3D services only support one test at a time\).

For any type of service, 3D \(unlimited\) or limited, the calendar does not let you choose dates that do not allow a five day lead time for testing Production deployments. On the calendar, available dates are outlined, while unavailable dates are grayed out.

Based on the start date, the calendar automatically reserves the number of business days required to complete the test for the selected assessment type. For example, the NST-S-250IP assessment type requires five business days and NST-S-500IP assessment type requires ten business days.

Calendar pop-up for choosing a test date
Test Window : (Optional) Although typically it is not necessary, if you want to you can specify a test window. A test window restricts the time in which the test can take place.
A test window can be useful for certain testing scenarios on Production environments; for example, if you want to restrict the time during which testing generates network traffic.

The first drop-down menu sets the start time \(that is, the time the test will trigger\). This overrides the default trigger time of 09:00 A.M.

The second drop-down menu sets the duration of the test window, which can be from 8 to 23 hours.

For example, choosing a start time of 10:00 A.M. and a duration of 8 hours results in a test window from 10:00 A.M. to 6:00 P.M.
Architecture* : This field is auto-filled with the architecture that corresponds to the target.
Programming Language* : This field is auto-filled with the name of the programming language that corresponds to the target.
Target Description : (Optional) Provide a description of the target application (the maximum number of characters allowed is 1,000).
Demo Call : A Demo Call date is set before a scan's Schedule Date, so that demos and scoping forms are reviewed before a test is run.
Demo call dates should be set to later than the current date and before the test's **Schedule Date**.
Test comments : (Optional) If you wish, you can enter comments here about the deployment and schedule for the test.
File Set : (Optional) Click the +Upload files button to upload the source code, supporting documents, or information that might be relevant to the test.
After you upload a file, choose its Asset Type: either **Source code** or **Supporting Documents**. Every file in the set of uploads that has an Asset Type of **Source code** will be tested.

All uploaded source code must be buildable code. The SLA \(Service License Agreement\) of the assessment assumes that the codebase contains no more than 500K lines of code \(500 KloC\).

These file formats are supported:

-   Archive formats, such as `.zip` and `.jar`
-   Any kind of file type if it is provided within an archive

The maximum file size is 300 megabytes per file. A maximum of ten files can be uploaded per test. There are no restrictions on the number of files that can be included within each archive file.
Note: After you schedule a test, you can change the uploaded file set at any time before the test completes.
When you click +Upload files, this page displays a dialog for uploading one or more files.
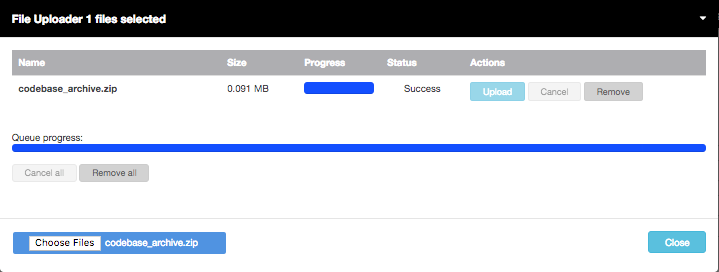
Click Choose Files to choose a file to upload, then click Upload to upload the file, and then click Close when you are done.
CAUTION:
Be sure to click Upload before you click Close. If you choose a file but then immediately click Close, the file is not uploaded.
Point of Contact Information
Specify a point of contact (POC) who will approve the running of your test. For more information about this section of the form, see "Point of Contact Information on the Schedule Page" in the Managed Services Platform Guide.
Parent topic:Scheduling Tests for Source Code Targets
Related information